Welcome to JemezVillage.com! As a valued vendor or business, we want to ensure you have all the tools you need to manage your bookings efficiently. Follow these simple steps to set up your hosting settings, set your availability, and create your booking calendar.
Step 1: Set Up Your Hosting Settings
- Log In to Your Account: Start by logging into your JemezVillage.com vendor or business account.
- Navigate To The Booking Portal: Next visit the Booking Portal in the account menu or visit https://jemezvillage.com/booking-portal/.
- Access Hosting Settings: In your dashboard, navigate to Calendars and then the ‘Hosting Settings’ gear icon.
- Configure Basic Calendar Settings: Enter your details , including Host Name (Calendar Title), Host Phone, Host Timezone (America/Denver) and about section. Upload an avatar and a featured image of your choosing so long as it fits our guidelines. Check Enable Landing Page Features if you wish to have your form as a landing page for other websites to be directed to. Choose which forms to show.
- Set Up Remote Calendars: Choose the type of business calendar you currently use or wish to use. Select the Calendar Provider of your choosing and login to your account. Grant the privileges to FluentBooking. Note: Sometimes you maybe sent back to the dashboard after logging in. Follow Step 3 again to access the settings again and browse to the Remote Connections.
- Configure Remote Calendar: Select the calendar to create events on and check the calendars you wish to check if you are busy. Often these are the same calendars. Select if you want to Enable Google Calendar Notifications or if Guests can see other guests. At this time you can add additional calendars by selecting the “+ Add” button.
- Zoom Integration: Click Connect Your Zoom Account and enter your Zoom Account ID, Zoom App Client ID, Zoom App Secret Key. Follow the documentation on how to get the API credentials from your zoom account.
Step 2: Set Your Availability
- Log In to Your Account: Start by logging into your JemezVillage.com vendor or business account.
- Go to Availability Settings: Visit the Booking Portal in the account menu or visit https://jemezvillage.com/booking-portal/, find and click on ‘Availability’.
- Create A New Schedule: Create a new Availability Schedule by clicking the “+ New” button. Name the Title, leave the time zone at (America/Denver), and click the “Add New Schedule” button.
- Select The Hours: Fill out the Weekly Hours section to match your weekly routine availability.
- Add Exceptions: If there are specific dates or times when you are unavailable, add these exceptions to your calendar by clicking the “Add a date override” button. Select the date and then adjusts your available hours or check “Mark to Unavailable” to be unavailable the entire day. Apply override. Note: You can delete these exceptions by clicking the trashcan.
- Save Your Availability: Click ‘Save’ to update your availability settings.
- Set Default Availability: Click the gear icon by the Schedule Title. Click “Set As Default.”
Step 3: Create Your Booking Events
- Log In to Your Account: Start by logging into your JemezVillage.com vendor or business account.
- Navigate To The Booking Portal: Next visit the Booking Portal in the account menu or visit https://jemezvillage.com/booking-portal/.
- Navigate to the Calendars Section: Click on “Calendars” on the booking portal menu.
- Create a New Event Type: Click on ‘+ New Event Type’ button and select if it is a One-to-One Type or a Group Type.
- Enter Booking Details: Fill in the necessary details such as the Event Title, description, Meeting Duration, Locations, and maximum amount of spot per slot. Check if you want to Display remaining spots on the booking page.
- Save Your Booking Event: Once all details are entered, click ‘Continue’ to create your booking calendar.
- Availability Settings: Click on availability on the left hand menu of the Event. Fill out the availability details, Availability Range, Custom Schedule or an existing schedule, then save changes. Note: Your default Availability schedule will be selected.
- Set Time Limits: Click on ‘Limits’ on the lefthand event menu. Fill out the Limits, Buffer times, Minimum Hours before appointment, intervals, booking frequency, total duration, locked Timezone. Save Changes.
- Booking Questions: Click ‘Question Settings’ on the lefthand event menu. Customize the questions on the booking page. Click ‘Edit’ next to the question you want to update or add more questions. ‘Save Changes’ when done.
- Email Notifications: Click ‘Email Notifications’ on the lefthand event menu. Turn On or off Booking Notifications or select Edit to edit the email for that notification.
- SMS Notifications (Twilio Account Required): Currently Inactive unless you have a Twilio account.
- Advanced Settings (advanced and optional): Click ‘Advanced Settings’ on the lefthand event menu. Change the Advanced setting to fit your needs but only if you need these features.
- Payment Settings (optional): Click ‘Payment Settings’ on the lefthand event menu. If you wish to collect payments for the booking prior to that appointment, check to enable payments. If you have a product on the market place you wish to connect to this booking, select Use WooCommerce Checkout and select the product. Check a payment option you wish to offer. Set your session fee and if you wish Add more price Items for the session. Save Changes.
- Webhooks Feeds (advanced and optional): Click ‘Webhooks Feeds’ on the lefthand event menu. If you need to use a webhook to communicate to another site, you can create it here. If you do not know what a webhook is, don not worry about this section.
- Integrations (Not Needed): Click ‘Email Integrations’ on the lefthand event menu. This section is only to be setup if directed by JemezVillage.com Support staff.
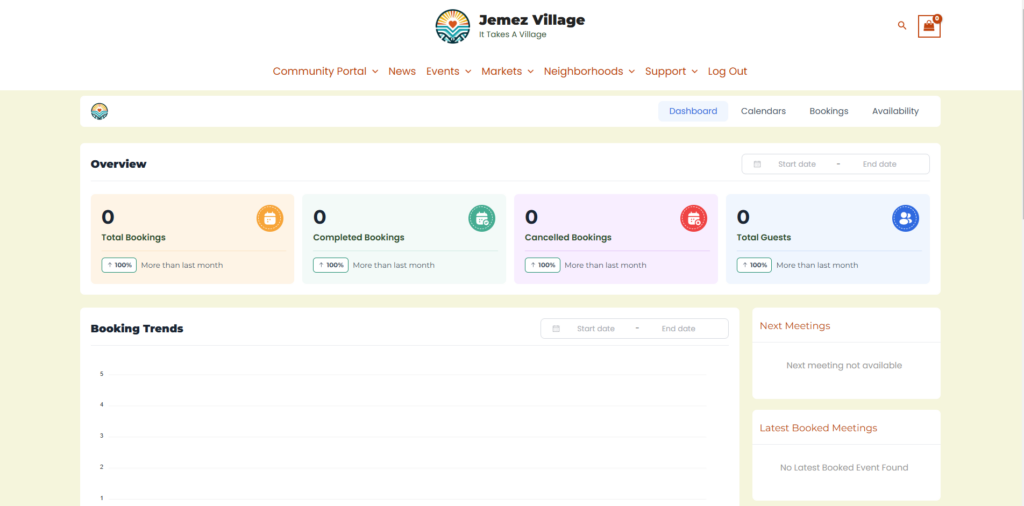
Manage Your Bookings
Once your hosting settings are configured, availability is defined, and calendar is set up, you can easily manage your bookings through your dashboard. View upcoming bookings, make adjustments, and communicate with your customers seamlessly.
Need Help?
If you have any questions or need assistance, our support team is here to help. Contact us or fill out a support ticket.